Wednesday, December 22, 2010

Busy week of Cakes....Sweet 16...50th Birthday...Baby Shower.....Jenn's Bithday!


What better theme than "Hollywood" for a special girl for her "Sweet 16" birthday party.  So I stuck with red, gold, silver, and black to resemble the Hollywood theme.  I went with a red carpet down the center and stars revolving around the cake, with an added movie reel and video camera.  Definitely the most challenging part of the cake was the sign on top with Mallory's name.  It was heavier than anticipated and was hard to attach the wooden dowels into the fondant sign.  But after two tries I finally reached success!
Thanks again Candace for asking me to do the cake and I hoped Mallory felt like a Hollywood Star!

This next cake was for for my friends father-in-law on his 50th birthday.  As you can see, he is a big Vancouver Canucks fan!  This cake was chocolate, with a chocolate filling and vanilla buttercream!  Chocolate definitely seems to be my most popular flavor!  
Thanks Michelle for asking me to make the cake!
 So I attended a small baby shower this past weekend and wanted to bring a little cake to celebrate the occasion.  I knew the soon to be mommy, Lindsey, was allergic to gluten so I had to figure how to make a gluten free cake that still tasted good!  Well I went with a vanilla cake recipe and substituted a couple ingredients with gluten free products and the end result seemed to turn out fine.  Lets just say the batter did not taste good, but in the end the cake turned out great, very sweet, but good!
My first success at red velvet cake!  I have tried two recipes in the past and not been completely satisfied with the result, but this new recipe I tried was delicious!  And of course the best and only icing to pair with red velvet cake is cream cheese icing!  This cake was for Jenn, my cousin!  Her birthday happen to land on the same day of our Christmas gathering, so I decided to bring a cake along to celebrate her birthday along with Christmas!

Sunday, December 12, 2010

My Nephew is one special Birthday Boy!

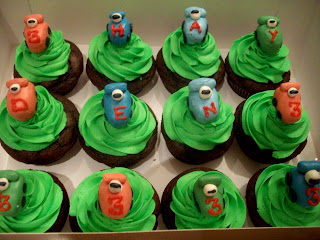
Well these special cupcakes and cake were for my nephew, Hayden. Hayden was one spoiled birthday boy because he had two separate birthday parties, hence the two different cakes. For his family birthday party I made neon green race car cupcakes. Hayden absolutely loves cars, so I thought it would be a good and simply idea. The race cars are molded out of fondant, and then I piped letters and numbers on the race cars with buttercream icing. Then for Hayden's birthday party with all his little friends I let him pick what kind of cake he wanted.  He loves the movie Cars, and loves the main character, "lightning mcqueen."  So I did my best to mold a real life lightning mcqueen race car on the top of the cake, and then thought I would do a race car flag with the checkers for the top layer, and match the red of the car to the bottom layer.  The flavor of the cake is all chocolate, but the top tier had a peanut butter filling, and the bottom tier has a chocolate fudge filling.  This cake was a lot of fun to make, and was definitely worth it to see the smile on Hayden's face!  HAPPY 3RD BIRTHDAY HAYDEN!!


First round of Christmas baking...

 Cranberry Bliss Bars & Chocolate Peanut Butter Cups
Well if you enjoy Starbucks cranberry bliss bars, then you will loves these because they are very similar.  They are topped with a cream cheese icing and craisins.  Not too chewy, but not too crunchy!
The chocolate peanut cups are my favorite. You only need four  ingredients, but it does take time to let the chocolate cups form.  All you need is peanut butter, icing sugar, butter, and hershey kisses.  You need to line a mini muffin tin with paper cups first, and then once you have melted some of the hershey kisses (or you could use chocolate chips) you brush the melted chocolate in the sides and bottom of the paper cups.  You can then put it in the fridge for 20 minutes.  You then check each chocolate cup and add more melted chocolate to the thin areas.  Then put in the fridge over night.  The next day you tear the paper cups away from the chocolate and you have a nicely formed chocolate cup that is then filled with a peanut butter, icing sugar, and butter mixture with a hershey kiss to finish it all off.

 Christmas Cupcakes
I did three different kinds of christmas inspired cupcakes for a christmas party I was attending.  The four cupcakes with the darker icing are hazelnut/nutella cupcakes topped with a gummy snowman or christmas tree.  Then there are chocolate cupcakes topped with buttercream icing and a christmas wreath.  Then there are pumpkin cream cheese cupcakes with fondant gingerbread cut outs and gold sanding sugar.

Wednesday, December 1, 2010

CHRISTMAS is here........time to bake!

ELEGANT WHITE CHRISTMAS TREE CUPCAKES!!!!!
Christmas is finally here, and it is time to start your christmas baking.  This recipe is by Paula Dean, and great for the holidays!  They are pumpkin spice  cupcakes, topped with a butter cream cheese icing, which is the best part.
To create the Christmas tree I used a wilton tip #21, (you could also use one size smaller or bigger) and created a center base before I started to pipe the rest of the tree.  I originally saw this idea in green, like a usual Christmas tree, but I also think that you could do it in any color.  Then I used silver sugar balls, and gold sanding sugar to give it that finished sparkle look.  You are able to get both of these decorations at cake decorating stores.  I get mine from scoop n save in Langley.
This is such a great idea for a hostess gift over the holidays.  If the christmas tree is a little too difficult, you can simply decorate the cupcake normally and then add the sanding sugar and silver sugar balls for a decorative touch!
 Baking Tip-  Do you ever notice that after you bake cupcakes, the cupcake liners sometimes fall off or separate from the cupcake?  Well I have came across this many times and finally found a solution?
To avoid this happening, make sure you fill the cupcake liners three quarters full so that when they bake they rise up and over the liner.  Also, make sure to remove the cupcakes from the pan right after they are taken out of the oven.  Both of these tips should help the cupcake liners stick and hold.
Stay tuned for more Christmas baking ideas!


Monday, November 15, 2010

Chocolate Delight for Leanne!!!

This special cake was for my cousin Leanne's birthday!  I was inspired to do this cake from a picture I saw in a magazine.  The first step in making this cake was to make the chocolate squares that surround the outside of the cake, which can get a little tricky.  I melted milk chocolate and white chocolate in a double broiler until it was completely melted and smooth.  Then I spread it onto a cookie sheet covered with parchment paper.  I spread it just thin enough that it would still be able to cut once solid.  So then I set the chocolate in the fridge to harden.  Once hardened I then cut the squares with a knife.  But the trick is to dip your knife in hot water before cutting to help the chocolate from breaking.

Then the rest of the cake was three layers of chocolate cake with chocolate chips in it.  I used a fudge pudding filling for one layer, and then a hazelnut buttercream for the next layer of filling.  Then I topped it with alternating hazelnut and vanilla buttercream. YUMMY!!

Monday, October 18, 2010

Lemon Fresh

This is a brand new recipe....Lemon Cupcakes! If you are a fan of lemon, then you will love these cupcakes.  They are sweet, but also have a slight lemonly tart flavour to them. To create the lemon flavour in the cake and the icing, I use grated lemon zest.  I also used a small amount of yellow food colouring to tint the icing a soft yellow.  Then to perfect them I used yellow sprinkles and little pearl white sugar candies.  You could also use little candy lemon wedges to decorate them, which would go along with the lemon theme.  I just got a little lazy and settled for sprinkles and sugar candies.  If you wanted to spice things up and add more flavour besides just lemon, I thought you could add blueberries.  You would then have a lemon blueberry cake, with a lemon icing!

Sunday, October 3, 2010

My very first wedding cake....thanks Michelle and Raymond!

Well here it is.....my very first wedding cake!  Now let me tell y'all, making a wedding cake takes a long time......and A LOT of fondant!  No lie,  I actually got a work out rolling out all that fondant. Just a nice helpful hint that I learnt the hard way.....don't use shortening to grease your counter before rolling out fondant, please use sifted icing sugar, and continue to apply more sugar after a couple rolls to make sure it doesn't stick to the counter.  The little white daises you see on the corners of the cake and down below are such an easy and elegant way to accent a wedding cake, especially using white on white.  Once each flower is made I put them on flower formers to dry over night and this way they don't lay flat on the cake, but curl up and form a more real life flower structure.  They are time consuming but definitely worth the added touch.  I simply used white pearl dust to make them have a shiny and glittering affect.  Then I used fresh gerber daises and ribbon to complete the cake!

Thanks Michelle and Raymond so much to allowing to me to make your wedding cake, because I know it was my first and there was no guarantee....lol!

Thursday, September 23, 2010

More Cupcakes.......

 Well this was my first time using chocolate ganache, and it is very easy to do with cupcakes, but not so easy to cover a cake in ganache.  To make ganache all you need is dark chocolate and heavy/whipped cream.  Once you have prepared the ganache and have let it cool, then all you do is take the cupcake and dip it in the ganache and then let the excess drip off and once it has stopped dripping then place on the counter to set.  The flowers I added to both cupcakes are made out of white and dark modeling chocolate!  You could also use fondant, but modeling chocolate tastes much better than fondant!

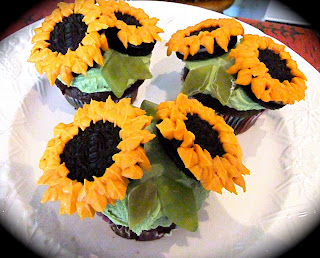
Sunflower Cupcakes

For these cute cupcakes all you need are a few simply ingredients.  You need OREOS for the center of the sunflowers, and then I bought GREEN WINE GUMS  and sliced them very thin to use as the leaves. You could also use fruit leather as well.  And then for the petals, you simple get a ziploc bag and cut the corner like a top of a triangle.  Fill the bag with you icing and when you pipe it out of the bag, it will give you a perfect pedal look!  I used chocolate cupcakes, with a new Peanut Butter frosting which was to die for!!!  But make sure to use a icing that had a good consistency because if you icing is too soft the pedals will not hold its shape on the oreo

Sunday, September 12, 2010

What's better than Jewelry and Cake put together????


Well this cake was inspire by a friend.  My friend's Mom was having a surprise 50th birthday, and her husband was actually getting her something from Tiffany's, so they wanted a cake that looked like a Tiffany's Box.
This was my first time using fondant, but the only part of the cake that is fondant is the white ribbon and bow, and also the jewelry on the cake board.  The rest of the cake is just covered and smooth with a buttercream icing, and I used a turquoise gel food colouring to tint the icing.  Turquoise is a very bold color, so you don't need much to colour the icing.
To make a fondant bow it is actually quite easy.  You cut out four strips, two a little big bigger if you want the bow to be bigger than the ribbons( which I did) and a smaller strip for the middle of the bow.  To attach the bow together you can use water or clear vanilla extract.  Make sure to attach the bow together and let it dry before placing on the cake.  There are also many videos on youtube on how to make a fondant bow, which are very helpful!  Gotta love youtube!!!!

Saturday, September 4, 2010

Mastering the BASKETWEAVE!!!!


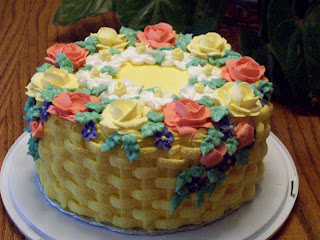
The basketweave definitely looks harder than it actually is!  It is just quite time consuming and if your icing is too stiff (which mine was) your hand gets very sore! But ANYONE can learn how to do the basketweave!
 So this cake I made for my second cake class, and it is chocolate cake with chocolate chips.  It is three layers with chocolate fudge pudding in between the layers, and a buttercream icing which I colored yellow with gel food coloring.  Helpful hint: try to always use GEL food colouring because the gel food colouring will not change your consistency of the icing. For all the flowers I used royal icing.  Royal icing is simply made out if icing sugar, water, and meringue powder.  This type of icing dries very hard and is perfect for making flowers that hold their shape and look great, and they are also edible.

Wednesday, September 1, 2010

Boobilious Cakes...Great Cakes for Lingerie Showers!


This Boob Cake, as I like to call it was for my friend Michelle's Lingerie Shower.  This was my FIRST DISASTER CAKE!  I dropped the first cake on the ground when I was flipping it out of the pan.  Then I made a second cake and it didn't come out of the pan like I thought, and it fell into pieces and was one crumby mess. At this point I was ready to through the cake everywhere and cry...lol!  Third time was the charm!  Luckily I had my Mom step in and help, and she suggested using parchment paper at the bottom of the pan.  NOW I ALWAYS USE PARCHMENT PAPER, just to make sure the cake easily comes out of the pan!  For the boobs you can use a wonder mold pan, or I used a glass measuring cup.  Just simply fill the measuring cup a quarter of the way full with cake batter.  Once they are baked, you may need to shape them and shave them down a bit, but it's as simply as that!

This second Boob cake I made for another friend that was also named Michelle!  I just did chocolate covered strawberries around the outside for an added decorative touch!  This cake is a hazelnut cream cake, with a hazelnut filling and a vanilla buttercream icing!
Thanks girls for letting me make your lingerie cakes for you.....I had a blast decorating them!

Helpful Easy Tips for Baking!

These are some great easy heplful tips I learnt from my first cake class!
1.  Bake your cake at 325 degrees instead of 350 degrees, which alot of recipes say. Baking your cake at this cooler temperature will help keep it moist and not dry!
2. Don't spray the sides of the cake pan, it will make them hard and crunchy!
3. Add meringue powder to your buttercream and this will make the icing harden so it is much easier to smooth!
 This is a two layer devil's food chocolate cake that I also made for cake class.  I simply used a greeting card as my template and used it as my design for the whole cake.  I used a cardboard cake circle that you can get at michael's craft store for my cake base.  But I recommend covering the cake board, because my looked like crap after the cake was made!  The buttercream icing is very messy and the grease from the icing made the cake board look nothing but ugly by the end...hahaha!

From the Beginning.......

I always thought that store bought baking was a SIN!  I grew up in a house that never had store bought baking.  For as long as I can remember my Mom always loved to bake, and I always loved to be her little helper with the hope of eating lots of the dough!  Now I have discovered my own love for baking and cake decorating! So I decided to take some Wilton Cake Decorating Classes.  

This is my first cake I made from class.  THE CLOWN CAKE!  The only think that is not edible on the cake is the actual clown's head.  The clowns are actually really easy to make, they just take a lot of icing, and it must be the right consistency!